Beginner Astrophotography: How to Get Started
If you want to take incredible pictures of the night sky, but don’t know where to start, you’re in the right place.
Astrophotography requires a very specific set of equipment and techniques, and it can be overwhelming for a beginner.
If you have ever gotten lost in the technical specifications of a certain telescope or camera and wondered if it will actually perform well for astrophotography, you are not alone. You know the type of pictures you want to capture, but choosing the right equipment for your budget is where things get fuzzy.
Popular Post: Recommended Telescopes for Astrophotography
In this extensive guide, I’ll explain how to take your very first photo of the stars, the Milky Way, or even a deep-sky galaxy or nebula. I’ll cover everything from camera recommendations to image processing tips to help you get the most out of your photos.
I’ve been taking astrophotography images from my backyard in the city for over 10 years now, and I know how challenging this hobby can be early on. You can take sensational astrophotography images using beginner-level gear with the right tools and techniques, and I am here to make sure you get it right.
Trevor Jones (AstroBackyard on YouTube)
Astrophotography How-To
There are many different types of astrophotography, from wide-angle Milky Way photography to deep-sky photography through an astronomical telescope. The basic elements of this hobby include the understanding of long-exposure images, focus, and image processing.
The following basic astrophotography tips and camera settings can be put into action the next time you find yourself under a clear night sky with your camera. I’ll also show you a beginner astrophotography setup for capturing deep-sky images using a camera and telescope. If I can do it, you can do it too.
Perhaps the intense colors of the Orion Nebula or the glimmering Pleiades star cluster have sparked your interest in astrophotography. Or maybe a haunting landscape photograph dominated by a full moon is more your style. However you got here, I understand your passion.
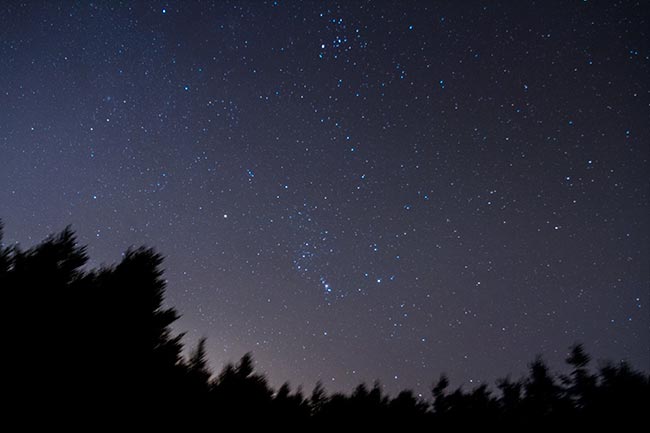
Night sky photography requires a basic understanding of your camera’s ISO setting and the process of taking long-exposure images. If you are a beginner, I’ve got good news. With an entry-level DSLR camera and a tripod, starry landscapes like the one below are within your reach.

A starry night landscape astrophoto captured using a DSLR camera and lens on a tripod.
The photo above did not use a telescope to capture the scene. Instead, a wide-angle camera lens was used to properly expose the picture and showcase the colorful stars in the night sky. If you’re interested in capturing “starscape” style images like this, have a look at my top 7 astrophotography tips for beginners.
Astrophotography can come in many different forms. It is wise to choose your subject matter based on the camera equipment you currently own. Setting your expectations of what’s possible with your personal gear will help you stay motivated and learn what’s needed to take the next step.
My astrophotography equipment has evolved and expanded over the past 10 years, and the learning process never ends. The small milestones and gradual progress along the way are what motivate me to continue pushing forward.
There are simple ways to get started in astrophotography that don’t require a large investment of time or money.
For instance, with a basic DSLR camera and a tripod, landscape images of the Milky Way and the Planets are well within your reach. Whether you’re shooting a lunar eclipse, meteor shower, or a familiar constellation of stars, the sensitivity, and control of modern camera sensors are well-suited for astronomical imaging.

Astrophotography images captured using camera lenses of varying focal lengths.
When you are ready to take your passion further, I’ll explain how to use a camera and telescope to take deep-sky images of galaxies and nebulae. This includes sharing my knowledge of camera control software, autoguiding, image processing, and much more. As you learn about new hardware options available to you, you will also need to familiarize yourself with the latest astrophotography software as well.
The backyard setup shown below may seem a little complex at first, but it did not happen overnight. If you are passionate about astronomy and photographing objects in space, your progression and enjoyment in the hobby of astrophotography will last a lifetime. To review each piece of gear I use to capture images of space from my backyard, be sure to visit the astrophotography equipment page.
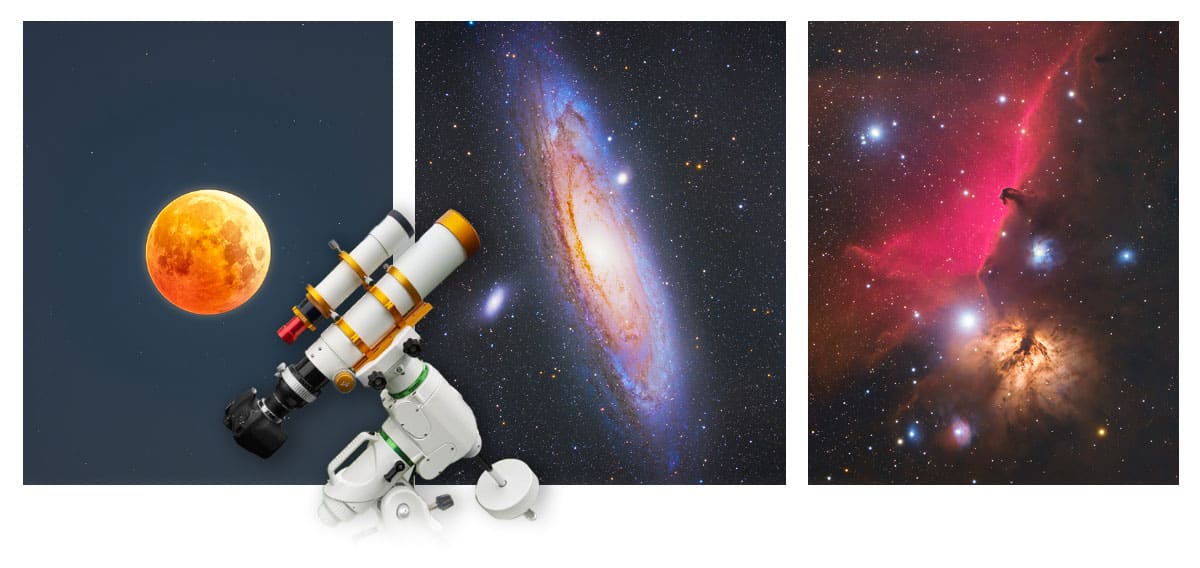
Your telescope is a key piece of equipment, here are the ones I recommend.
Beginner Astrophotography Tips
We all have to start somewhere. If your passion is strong enough, it will carry you through the steep learning curve involved in astrophotography. Early on, I did not have a lot of money to invest in this hobby, and my basic equipment reflected that. I purchased a lot of my early items from used astronomy gear websites and classified ads.
One look at a typical deep-sky imaging setup may have you scratching your head. The good news is that you can slowly build your astrophotography kit to accomplish your goals over time. Once you understand the type of astrophotography that interests you most, you can narrow down the gear needed to get the job done.
Choosing a camera, telescope, and equatorial mount that delivers the results you’re looking for takes time. Avoid the temptation of purchasing the ‘best’ equipment money can buy from the start. First, you need to first learn the night sky – and the basic principles of night sky photography.
For regular updates on my progress, and all of my best astrophotography tips, please subscribe to the AstroBackyard newsletter.

A Beginner Telescope
I started with a digital camera and a small (non-tracking) beginner telescope.
A Dobsonian reflector is a fantastic way to learn the night sky from your location and begin to appreciate the scale and vastness of space. It requires that you manually move the telescope by hand, and observe the deep-sky objects you find in the eyepiece.
Over time, my equipment evolved into a deep-sky astrophotography kit that allows me to photograph galaxies, nebulae are star clusters. A tracking telescope mount and astrophotography telescope are required, but I advise that you take small steps toward your goal of deep-sky imaging.
A visual telescope is what sparked my passion to photograph deep-sky objects, and helped me to better understand what it’s like to spend a lot of time under the night sky. I highly suggest taking this route before jumping into astrophotography too fast. Visual astronomy is a completely different experience than taking pictures, and one that I seem to enjoy more and more every year.
The last thing you want to do is rush into making a purchase that you regret. Below, I will describe the gear that has provided me with actual results for a reasonable price. For a look at my most recent equipment in action, subscribe to AstroBackyard on YouTube.
Deep-Sky Setup Walk-through
Using a DSLR and telescope allows you to take high-magnification images of jaw-dropping subjects such as the Eagle Nebula. Beginners often ask me how I got started in deep-sky astrophotography with a telescope, and what equipment I use to take photos of the night sky. DSLR astrophotography is a great way to get started, as you may already own a beginner-level camera that will work great for capturing images of space.
In the video below, I walk you through the process of capturing deep-sky astrophotography images using a DSLR and telescope. It’s a high-level overview of the processes involved but should answer many of the questions beginners have about astrophotography.
Choose an Area of Interest
I try to cover all aspects of astrophotography on this blog, but subscribers of my YouTube channel know that I spend more time imaging through a telescope than anything else. Some people prefer different areas of astronomy including Solar imaging, Moon Photography, or Milky Way Photography.
It’s no secret, deep-sky astrophotography is the realm of this hobby where I spend most of my time. There is just something incredible about the thought of photographing another galaxy, filled with its own solar systems and planets that gets my heart pumping.
What type of astrophotography are you most interested in?
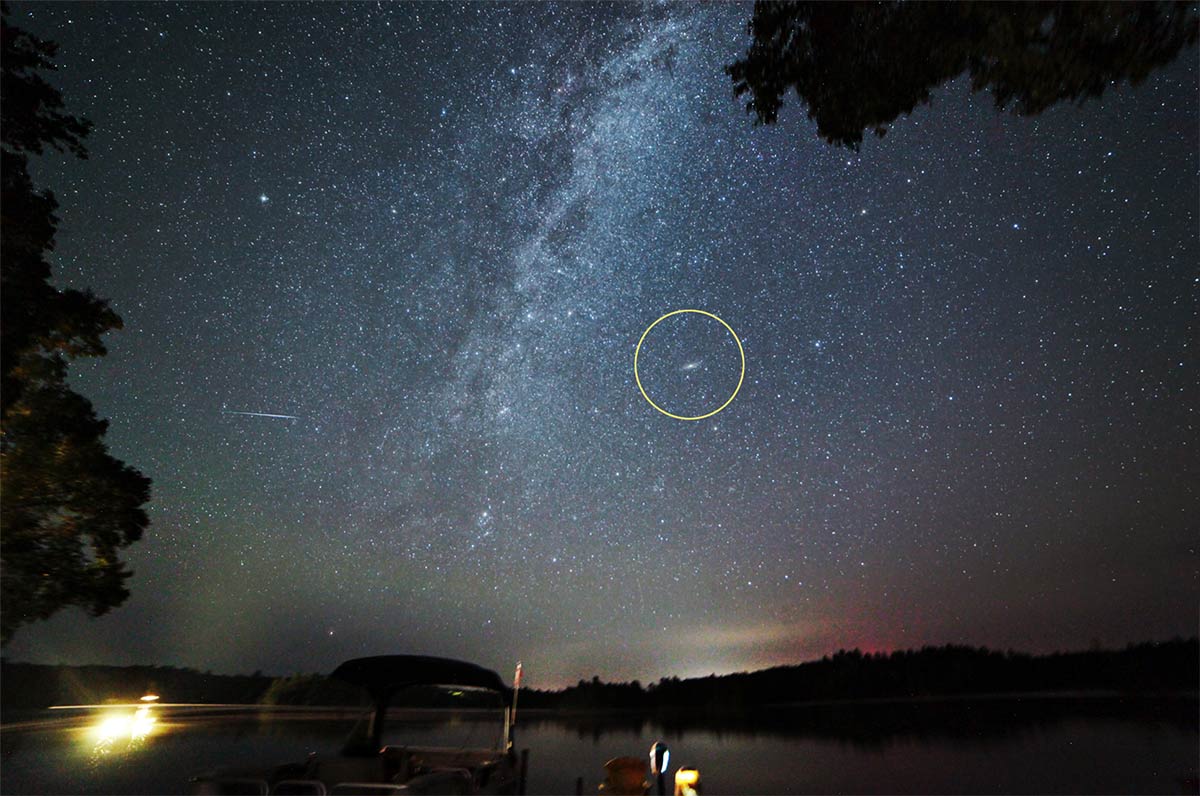
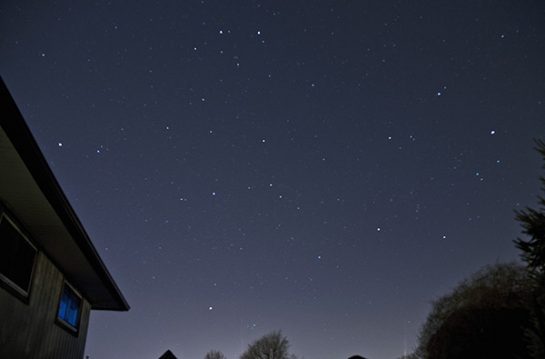
The constellation Perseus rising over the lake with the Andromeda Galaxy visible.
If you’re like me, you love all types of images that involve the night sky. However, a quest for a particular type of image may lead you down a new path that involves a new set of equipment and techniques. For instance, the photography equipment required to capture a photo of a lunar eclipse is very different than what’s needed for a long-exposure image of an emission nebula.
The image below features a deep-sky astrophotography setup, including a dedicated astronomy camera and a complete autoguiding system. The three keys to a successful deep-sky imaging run are accurate polar alignment, tracking accuracy, and balance.

A basic deep-sky astrophotography setup using a dedicated astronomy camera.
Types of Astrophotography
Let’s cover the different types of astrophotography that await you. The night sky is diverse, it’s full of billions of stars and some incredible treasures in between. The type of astronomy subject you are interested in will eventually decide which equipment you purchase, and the camera settings you will use.

Types of astrophotography include landscape, planetary, and deep-sky.
Some methods have a lower cost of entry and can be done with little more than a beginner DSLR camera on a tripod, while others will require some additional hardware to achieve results. The photo above features images I have taken from both a tripod and through a telescope.
DSLR Camera and lens on Stationary Tripod:
Nighttime landscape photography is incredibly popular these days. Most images tagged #astrophotography on Instagram are exactly this. Whether it’s a shot of the Milky Way rising over a desert landscape, or simply a portrait of the Winter constellations, few images capture the mood that a night landscape can.
-
- Night Sky Time Lapse
- Meteor Shower Composite
- Milky Way Photography
- Constellation Composite
- Moon Phase Landscape
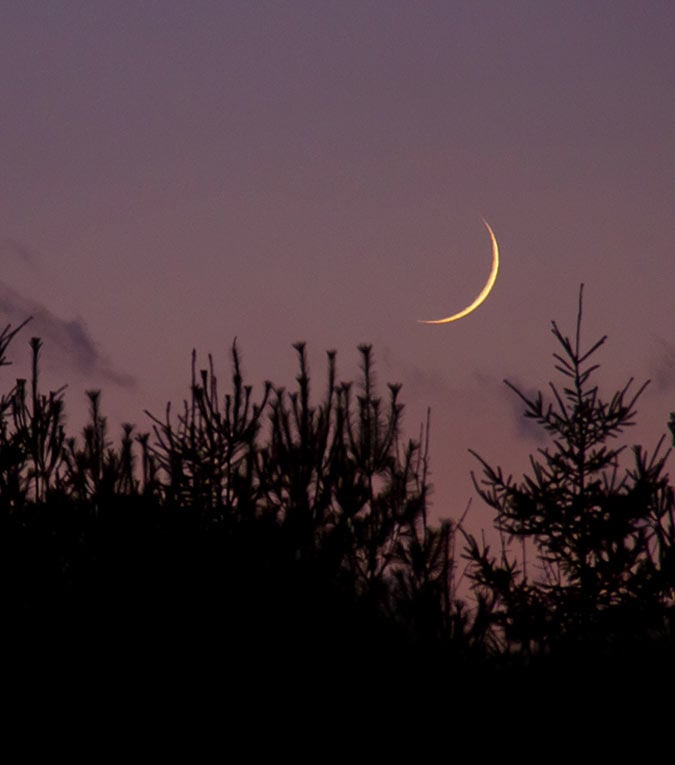
A Waxing Crescent Moon sets in the western sky.
DSLR Camera and Lens on Tracking Mount:
Adding a star tracker to the equation brings landscape astrophotography to another level. A wide-angle lens such as the Rokinon 14mm F/2.8 can collect light over an ultra-wide area of the night sky. With a tracking mount, exposures of 1 minute or more are possible, which means collecting a much deeper view of the sky.
- Deep Milky Way Photo
- Wide Field Deep-Sky Image
- Solar Transit (Solar Filter)
- Solar Eclipse (Solar Filter)
- Total Lunar Eclipse
Beginners often start with a small star tracker for wide-angle astrophotography images. Entry-level camera mounts such as the iOptron SkyTracker Pro, or Sky-Watcher Star Adventurer are a great place to start. This opens the doors to long-exposure photos that include deep-sky objects such as galaxies and nebulae.
The best part about this type of astrophotography is that you only need a small, portable, battery-powered setup to take part. This means that you can travel to dark sky locations, away from city light pollution for a memorable shot. The following photo of the night sky was captured from a Bortle Scale Class 3 location and reveals many of the incredible nebulae and star clusters in the sky.
![]()
The night sky toward the constellation Taurus. Stack of multiple 90-second exposures on a star tracker. Canon EOS Ra + RF 15-35mm F/2.8 lens.
A portable camera tracker is quick to set up and easy to polar align and balance when used with a camera and lens. The setup below features a Sky-Watcher Star Adventurer mount, with a camera lens attached. This is a very capable little rig that can produce stunning astrophotos, without a lot of the headaches and frustrations of a more complex setup.
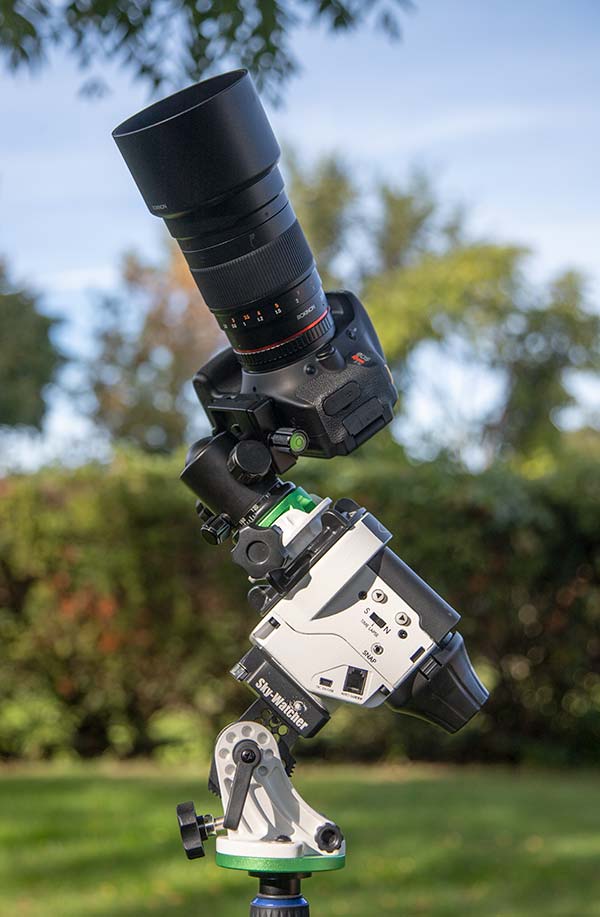
Sky-Watcher Star Adventurer with a DSLR camera and lens attached.
A mid-range telephoto lens like the Rokinon 135mm F/2 is an excellent choice for a setup like this. In the photo above, you can see this lens mounted to a Star Adventurer Pro using the ball head adapter. This way, you can point the camera in whichever direction you want for long exposure imaging.
Point and Shoot Camera through Telescope Eyepiece:
Eyepiece projection astrophotography involves aligning the camera lens with a telescope eyepiece, to utilize the magnification of the eyepiece and or/Barlow lens. This method is useful for planetary astrophotography, but not deep-sky imaging.
- Solar Transit (Solar Filter)
- Planetary Imaging
- Solar Imaging (Solar Filter)
- Moon Surface Imaging

The transit of Venus on June 5, 2012. Point and shoot camera through a telescope eyepiece (with solar film protection).
DSLR Camera attached to Telescope on Tracking Mount:
This is known as prime-focus astrophotography. The camera is attached directly to the telescope focus draw tube using an adapter. The focal length is determined by the type and size of the telescope’s optical design. The focal length is the ‘magnification’ of the telescope and determines the field of view your camera will see (how big an object will appear).
Focal lengths vary widely depending on the type of telescope used. A large Schmidt-Cassegrain Telescope may have a focal length of over 2000mm, which is ideal for photographing planets like Saturn, Mars, and Jupiter up close. The process of capturing very small objects (from our vantage point on Earth) is quite different than it is for large ones like nebulae.
A common focal length for a medium-sized refractor telescope is in the 400-600mm range, which is a practical magnification for most deep-sky objects in the night sky. The focal ratio of the telescope determines its ‘light-gathering’ power, and most refractors are in the F/4-F/7 range.
- Deep Sky Imaging (Galaxies, Nebulae, Star Clusters)
- Planetary Imaging
- Solar Imaging
- Detailed Moon Surface Imaging
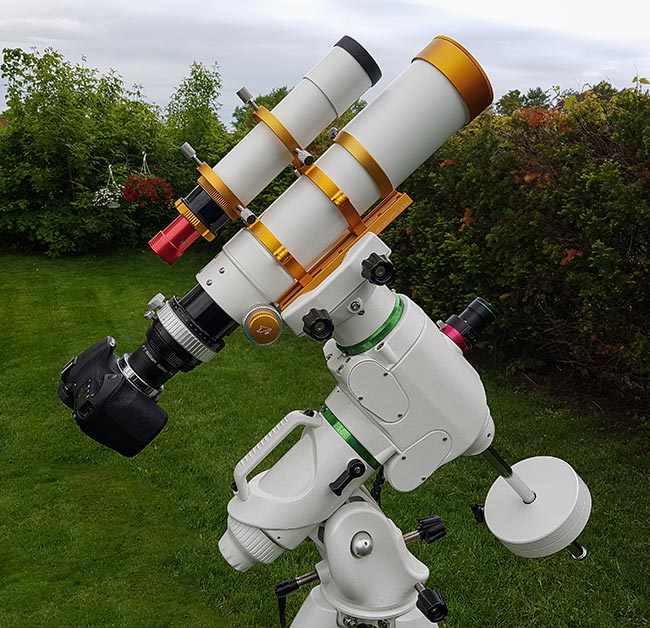
A DSLR camera attached to a telescope for prime focus astrophotography.
Astrophotography covers a wide variety of styles and photography subjects. The type of image you’re after is up to you. We all have our own goals and unique tastes. Personally, deep-sky astrophotography through a telescope is my biggest passion.
As time passes, I find myself becoming more and more interested in other types of astrophotography as well. For example, starry sky landscape images (nightscape photography) are becoming increasingly popular on social media, and I love the idea of traveling to dark skies for an unforgettable night sky photo.
How I Got Started
My very first steps towards deep-sky imaging were taking 15-second exposures with a Canon point-and-shoot camera through a Dobsonian Telescope. I believe a manual telescope like this is the best way to learn the night sky, and get a better understanding of what its actually like to spend a night under the stars.
I consider an 8″ Dobsonian telescope like the Apertura AD8 to be the best telescope for beginners. It’s how I got started, and why I still love astronomy today. For those looking for a little more guidance through the observing experience, the Celestron StarSense Explorer 8 is a fantastic option as well.

The Apertura AD8 Dobsonian Telescope for visual observing.
I did not yet know the necessity of an equatorial telescope mount for deep-sky imaging. However, I was thrilled with the modest images I was capturing of the Andromeda Galaxy at the time (even if it looked like a fain ‘smudge’).
I would aim my Canon Powershot point-and-shoot digital camera into the 25mm Plossl eyepiece that was included with my telescope. I had to stay completely still as the tiny sensor collected light on my object.
They may have been fuzzy, blurry blobs of light, but I knew that I was photographing another galaxy, and that concept absolutely blew my mind. This experience is responsible for the long road to where am I today, as a professional astrophotographer.
A Dobsonian telescope like this is fantastic for visual observation but not suitable for deep-sky astrophotography.
Early Results using a DSLR
My first few shots of the night sky were out-of-focus landscape shots of the summer constellations in my parent’s backyard. I didn’t own a tripod, so I would use a towel angle the camera just right for a lousy shot of the stars above. As this time, I wasn’t even sure how to properly focus the lens on a star.
At this time, I was using a Canon Rebel XSi I bought used from a friend at work. I used the only lens in my bag, an 18-55mm Canon Kit Lens. I took many photos of the night sky from my parent’s backyard, and I was beginning to feel the astrophotography ‘bug’ creep into my life. It was just what I needed at the time.
As humbling as those first few shots were, I could already see how the camera could capture more stars in the image than I could see with the naked eye. I think beginners are often shocked the first time they see the number of stars a camera can capture through a long-exposure image.

My first camera for astrophotography was a Canon Rebel XSi DSLR.
I later connected this camera to a telescope to take close-up photos of galaxies and nebulae, and it served me well for the first few years. I even decided to modify the camera for astrophotography myself, which involved removing the internal IR cut filter in front of the sensor. This was a common modification to make at the time, and it allowed for more of the reds of certain nebulae to be recorded on the sensor.
Taking Your First Shot
If you’ve purchased a DSLR camera and a tripod, you are ready to get started. To start, have a look at the weather forecast for this week.
If the weather is clear or mostly clear, you’re in luck.
Next, have a look at the current moon phase. Nights surrounding the New Moon phase are best, where the effects of the bright moonlight are minimal. The moon washes out the fainter stars and deep-sky objects in the night sky.
For many types of astrophotography, the night of the full moon is the worst night to shoot on.
Whether you choose to travel to an interesting location or shoot from your backyard is up to you. It might be best to practice these techniques at home before venturing out to a new location in the dark.
Making sure your tripod is locked securely, aim your camera towards the brightest star in the night sky. The stars you see will, of course, depend on the time of year you are shooting. If you do not see any bright stars, angle the camera towards a distant streetlight or another distinguishable light source.
You will use a bright star to focus the camera lens.
Make sure your camera is set to Manual mode, and that your lens is set to manual focus. This will give you full control of the light you let into the camera.
Turn on the live-view function of your DSLR, and have a look at the screen. Depending on your current settings and the brightness of your location, you may see several stars and your surroundings, or nothing at all. There are a few things you can do to see more light on the screen, including lowering the F-stop (Aperture) or bumping up the ISO (sensitivity to light).
Astrophotography Camera Settings
Focal Length: 18mm
Focus: Manual
White Balance: Auto
Aperture: f/4
ISO: 1600
Exposure Length: 25 Seconds
You can adjust these settings according to the DSLR camera and lens you are using. For instance, some lenses can let light in much faster with a wider aperture of F/2.8 or below. The Sigma 24mm F/1.4 is one example, and I have taken some incredible nightscape photos with it.
Focusing on a star
With the bright star(s) in view, magnify the image by 5X, and then 10X. Adjust the focus ring on your camera lens in and out until the star is as small as possible. This will ensure your focus is very close to where it needs to be for an astro image. Making some small focus adjustments and taking test shots will get you even sharper.
Compose your shot
Use the stars in your field of view to compose the shot you want. For example, if your goal is to capture the Milky Way stretching across the sky, make sure that the core of our galaxy is well placed within the scene.
Add some foreground interest to the scene by including the environment around you. For example, natural landscapes that include mountains, rivers, and tall trees can make your photo of the night sky very dramatic and add context to the location.
Choosing the right exposure
When shooting on a stationary tripod, images of the night sky will show star trailing after about 15-20 seconds. Knowing this, you’ll want to shoot exposures as long as possible before the stars begin to trail.
Some people find it useful to use the 500 Rule as a point of reference. You simply divide the focal length of the camera lens (X the crop factor of your camera) by 500.
Even if the exposure looks bright on the screen, you’ll be able to bring it back to a natural level in post-processing. In general, it’s best to shoot the longest possible exposure you can before star trailing occurs. If you are using a small camera tracker, you can compensate for the rotation of the Earth and capture sharp stars in exposures that are 2 minutes or longer.
ISO settings
A setting of about ISO 800 – 1600 should work well. Any higher than this will make the image brighter but come at a cost (more noise). Modern DSLR’s are much better at handling noise than they used to be but expect to see lots of grain shooting at ISO 3200 or above.
Noise can be reduced by capturing dark frames, and stacking the images together using software like DeepSkyStacker. For example, the image of the Carina Nebula below was shot using an ISO of 6400, yet the noise did not ruin the image thanks to an improved signal-to-noise ratio.
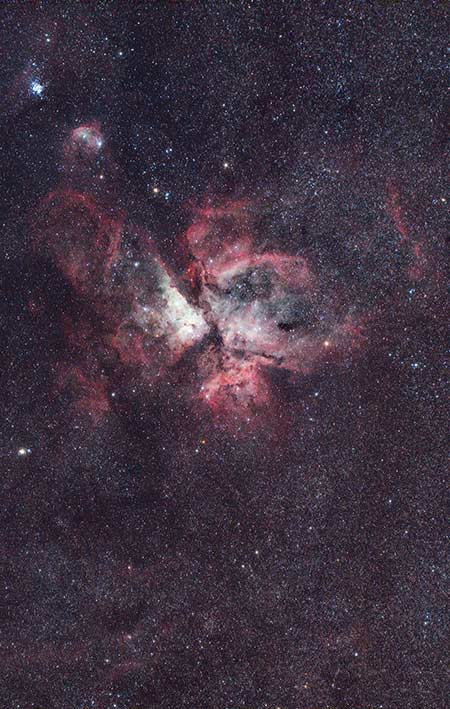
The stunning Carina Nebula captured during our honeymoon in Costa Rica.
It’s all in the histogram
Have a look at the data in the histogram below. This was a deep-sky image through a telescope, but the histogram is typical of any long exposure astrophoto. As you can see, the photographic data in the image sits in the right-hand third of the histogram, without clipping any highlights off the edge. This is a single image exposure that will need to be stacked with many more sub-exposures before any further edits are made.

A typical histogram of a deep sky astrophotography image taken with a DSLR camera.
Stretching the Image Data
Just like in regular daytime photography, the image histogram tells a story about the data captured in the image. Amateur astrophotographers tend to expose to the right, maximizing the light photons collected without clipping the data by overexposing. If you are using a DSLR or mirrorless camera, this is generally a good rule of thumb to keep in mind.
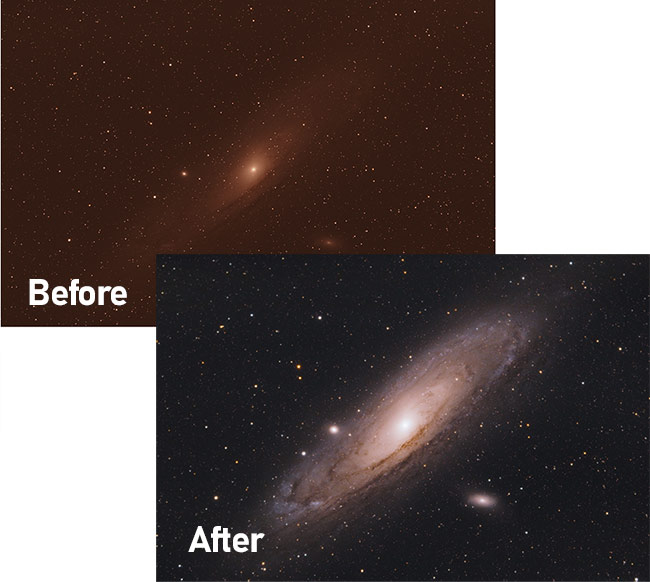
Astrophotography is a bit different, in the way that you need to stretch the data before you can really appreciate what you have captured. The difference between a linear (un-stretched) single image, and a non-linear (stretched) stack of images is remarkable. The photo seems to transform from a black screen with a few white dots, to an intense, colorful nebula.
In the example below, you’ll notice that only the bright core of the Andromeda Galaxy is visible in the original shot, while the processed final reveals the beautiful outer spiral arms of the galaxy. This information was ‘hiding’ in the image the entire time, it just needed to be stretched out.
There are many great tools available today for processing astrophotos. Some of the most popular choices include Adobe Photoshop, PixInsight, and Siril. All of these applications allow you to adjust the color balance, levels, and contrast of your photo to really bring it to life. The best software to use for image processing comes down to your desired user experience and the tools you feel most comfortable using.
I have written many Photoshop Tutorials for astrophotography, which is a common starting point for beginners that are familiar with the software. If you are looking for a complete list of the astrophotography software available today, be sure to visit the resources page for some ideas.
Entering Deep-Sky Astrophotography
My passion lies in photographing nebulae and galaxies using a camera and a telescope. This type of photography is known as deep-sky astrophotography and involves collecting several hours’ worth of exposure time on a single target.
The time spent outside collecting the data is only one-half of the equation. Many amateur astrophotographers find the second half of the process even more difficult, the image processing stage. For those of you looking for help in this department, I have put together an extensive astrophotography image processing guide containing many tutorial videos.
My first astrophotography camera was a Canon Rebel XSi (450D)
The type of camera used for deep-sky imaging is usually a DSLR, a dedicated CMOS sensor astronomy camera, or CCD (Charged coupled device) camera. DSLR cameras are one of the best ways to get started in deep-sky astrophotography, as they are affordable and user-friendly.
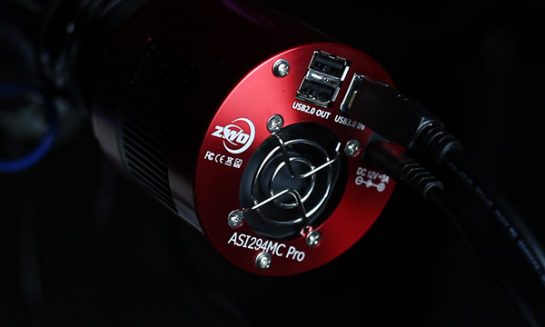
A dedicated astronomy camera such as the ZWO ASI294MC Pro (pictured below) has features that can help you produce incredible long exposure images. These cameras have TEC (thermoelectric cooling) to help reduce a lot of the noise present in a single exposure.
A monochrome camera such as the ZWO ASI2600MM Pro has an incredibly sensitive CMOS sensor that can produce even better images than a one-shot-color camera can. The debate about whether it is better to shoot with a color vs. a monochrome camera can only be answered when you decide what part of the experience is most important to you.
For example, if you don’t want to add an electronic filter wheel to an already complex imaging system, a color camera is your best bet. If you feel that your image quality has plateaued, or you are getting serious about narrowband imaging, a monochrome camera is a better fit.
When using a monochrome camera, separate filters must be used in a sequence of LRGB (Luminance, Red, Green, Blue) to create a full-color image of the subject. Narrowband filters that capture specific wavelengths of light (such as hydrogen alpha) can also be used to create even more dynamic photos.
Unlike a DSLR/mirrorless camera, a dedicated astronomy camera requires additional software to run the camera. The software allows you to set the exposure time and gain, and control important features such as the cooling temperature. Popular camera control options today include N.I.N.A. and the ASIAIR Plus.
Using a DSLR Camera
DSLR cameras record starlight onto the sensor just as the light from a regular daytime photo would. The difference is, much longer exposures are shot and combined to improve the signal-to-noise ratio.
A higher ISO sensitivity is used to maximize the light collected by the DSLR camera. ISO 800-ISO 1600 are typical camera settings for a DSLR astrophotography image. The best capture settings for your project will depend on the camera you are using, so you should take some test shots and review the data to find out.
The images are combined by “stacking” the exposures together. This reduces the amount of noise in the image and can reveal much more of the color and detail in the deep-sky subject.

Calibration Frames
Along with the individual photos you capture (light frames), you can benefit from taking calibration files such as flat frames. Calibration frames such as dark, bias, and flat frames help correct the issues that come with long exposure photography using a DSLR camera.
The image you see below is the Andromeda Galaxy. I took this photo in July 2012 from a dark-sky site on the North Shore of Lake Erie. This photo includes over 3 hours worth of total exposure time.
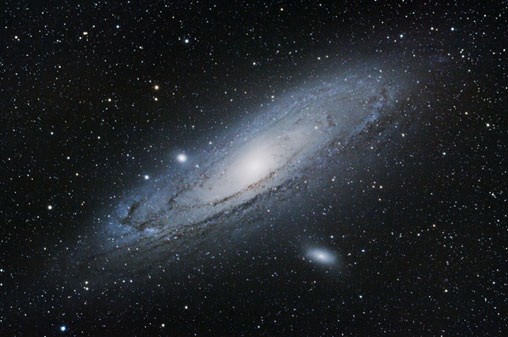
The Andromeda Galaxy photographed with a DSLR camera.
Professional deep-sky imagers tend to use sensitive CCD cameras with a set of narrowband filters, but a regular DSLR camera is the perfect entry point into the hobby. There is some incredible work being done with DSLR cameras that rival much more expensive dedicated astronomy cameras.
Attaching a Camera to a Telescope
To capture these deep-sky objects we need to use a telescope to bring these objects in for a closer view. The telescope acts as a super-telephoto lens, with typical focal lengths ranging from 400mm to well over 2000mm. The term “Deep-Sky” means distant objects in space, often millions of light-years away from Earth. This includes:
The focal length you are using will depend on the size and design of the telescope. I generally use a small refractor telescope with a focal length of about 400mm most often from the backyard. This is a practical focal length to use when shooting large nebulae regions in space, as I often do.

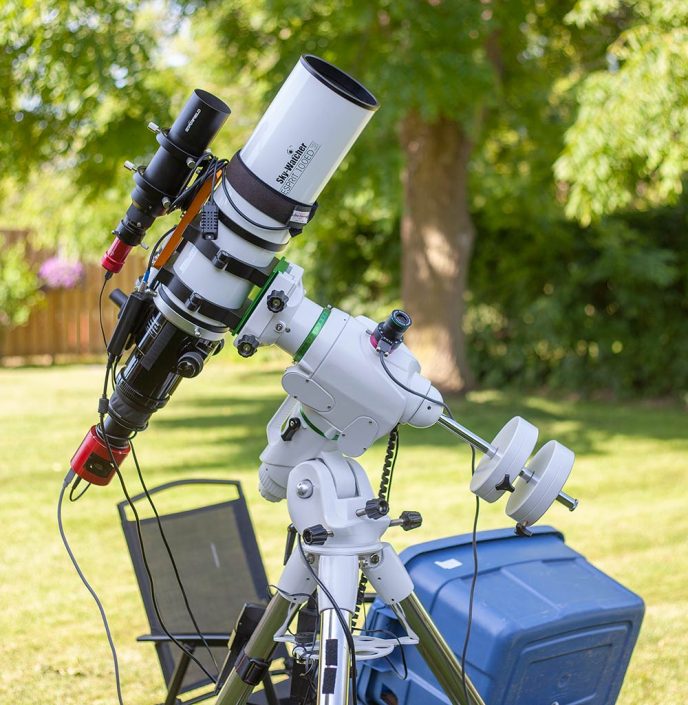
My DSLR astrophotography setup using a refractor telescope and tracking equatorial mount. (2016)
I suggest starting out with a refractor telescope with a wide field of view before diving into a long focal length (800mm+). This is simply because any issues in your tracking accuracy, autoguiding, and/or balance become more problematic as you increase your ‘reach’. Once you have mastered the process of capturing sharp images at 400mm, stepping up to 1000mm should be a smooth process.
When I first started using my Celestron Edge HD 11 telescope (2800mm), I found it difficult to star align my telescope mount and locate objects in the night sky using my original routine. This is because I was now looking at a very small area of the sky at once, and this leaves very little room for error in terms of pointing accuracy.
Choosing a Telescope
There are many telescopes to choose from, and they come in a seemingly endless amount of types and sizes. The main types of telescopes used for astrophotography are refractors, reflectors, SCT’s and RCs. Here are some examples of each type of telescope that I have personally used for astrophotography.
- Refractor: Askar SQA55
- Newtonian Reflector: Apertura CarbonStar 200
- Schmidt-Cassegrain: Celestron NexStar 8SE
- Ritchey-Chretien: iOptron Photron RC6
- Solar Telescope (H-Alpha): Sky-Watcher Heliostar 76
It should come as no surprise that telescopes can be expensive, so you may want to look for used equipment to save some money starting out. A compact refractor telescope has many advantages, and it’s what I recommend for beginners. Being able to take a successful ‘first image’ is important during beginner astrophotography outings, as achieving a positive result is more likely to inspire you to push forward.
A refractor telescope with a diameter of 80-100mm is considered to be ‘wide-field‘ in the deep-sky astrophotography world. These telescopes can capture most of the large deep-sky objects in the night sky within a single frame. Certain nebulae, such as the North America Nebula are so massive in apparent size, you may even need to create a mosaic to capture the entire thing.
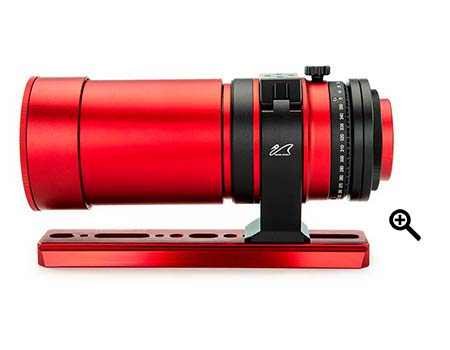
The William Optics RedCat 51 is an excellent choice for beginners
Wide Field Views
The downside of a wide-field telescope is that small objects such as most galaxies will appear quite small within the image frame. For example, The Whirlpool Galaxy is a gorgeous face-on spiral galaxy, but it appears quite small in a compact refractor telescope.
If small galaxies and/or high magnification views of deep-sky objects and planets are your primary interest, it will require a different equipment setup (here’s an example equipment setup for photographing galaxies).
I don’t advise beginners to attempt this type of imaging from the start. As the focal length of the optical instrument increases, so do the demand of the tracking platform and additional measures such as autoguiding.
One of the primary benefits of a wide-field instrument is that the larger deep-sky objects such as the Rosette Nebula (shown below) and the Triangulum galaxy will fill the frame nicely.
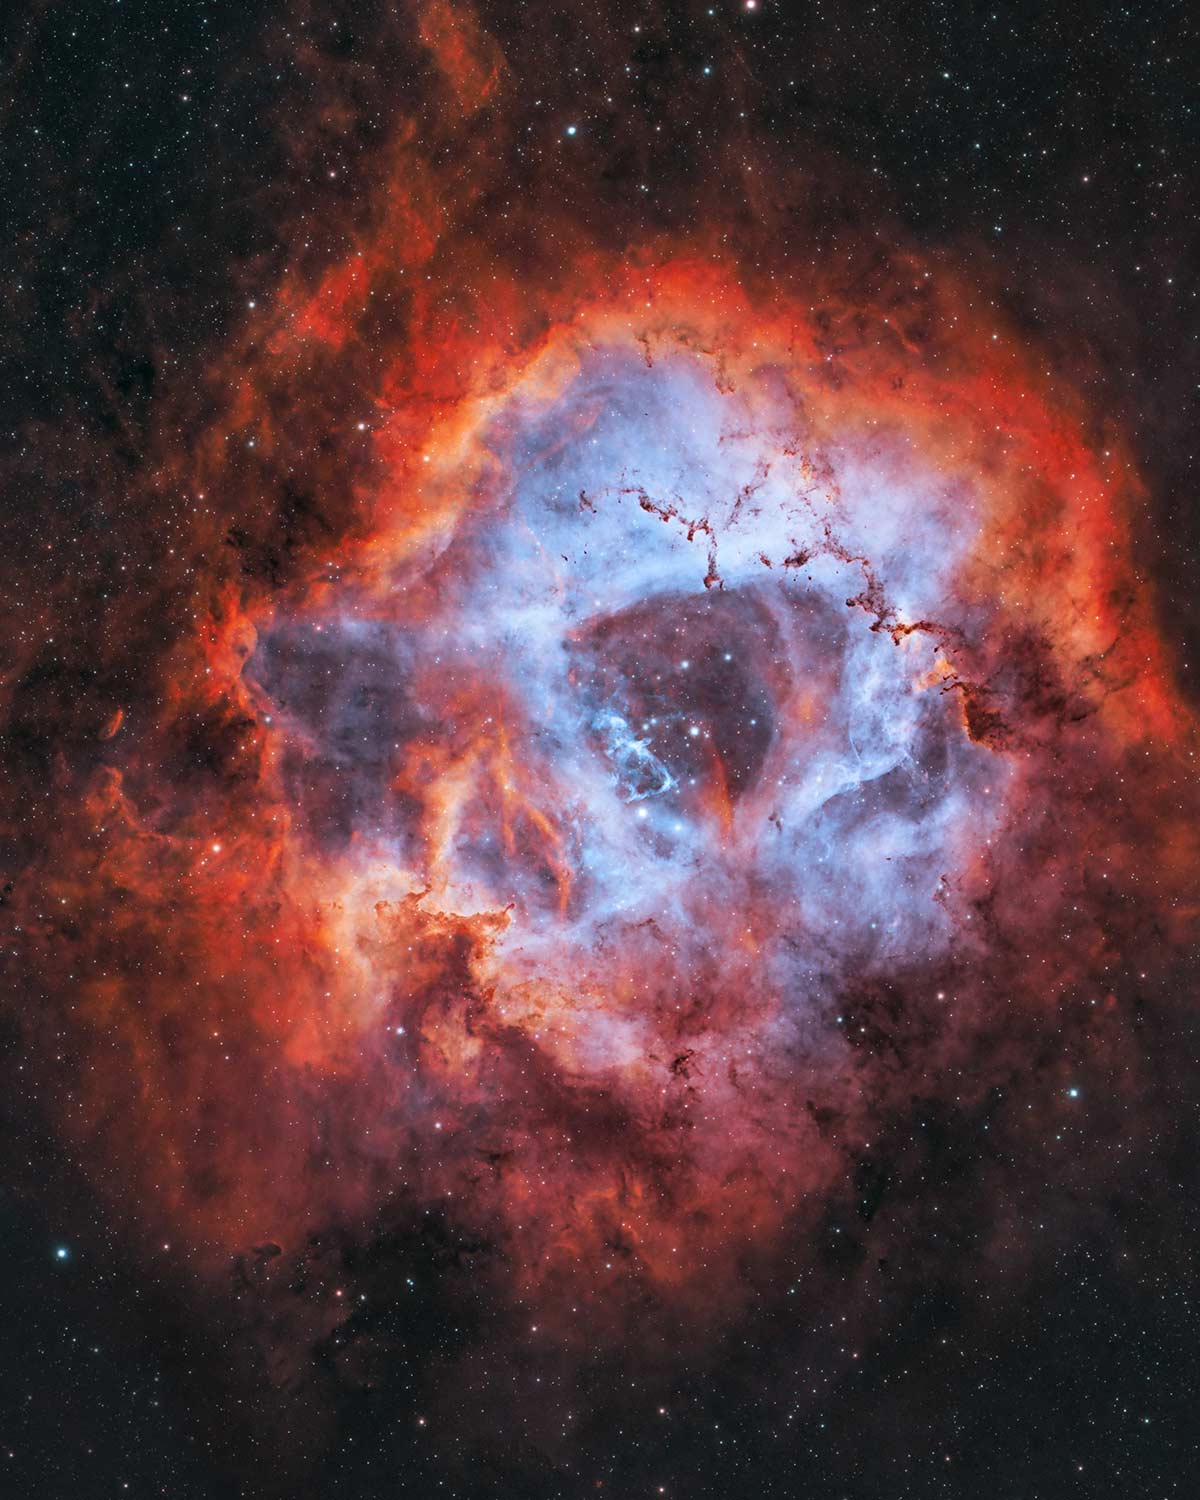
The Rosette Nebula. ZWO ASI2600MM Pro. Radian 75 APO.
Tracking Stars
In general, when it comes to deep sky, it’s better to shoot ‘wide and short’ in the beginning. Meaning shorter exposures through a small refractor telescope. This will increase your chances of success, and hopefully, inspire you to keep moving forward.
The longer your exposure is, the higher the chance that you will see an inconsistency in your telescope tracking. Your telescope mount may be capable of reliable 3-minute subs, but capturing an image for longer than may expose the limits of your mount.
![]()
An example of elongated stars due to poor tracking.
The same goes for the focal length of your telescope. In a wide-field refractor, stars may appear small and round in a 3-minute exposure using your current setup. An image of the same length may show elongated stars through a high magnification SCT telescope.
To improve tracking, there are a number of things you can try:
- Balance your telescope and astrophotography accessories
- Ensure that no cables are being pulled or snagging
- Improve the accuracy of your polar alignment
- Use autoguiding to make tiny adjustments to your mount’s tracking pattern
A telescope with a long focal length will magnify any issues in tracking accuracy.
For this reason, I think that the best beginner astrophotography telescope is a wide-field refractor, such as the Askar SQA106 or similar, which is best for beginner to intermediate imagers. This apochromatic refractor produces images with a flat field and excellent color correction.
At 550mm focal length, this telescope is much more forgiving in terms of tracking accuracy for astrophotography than one in the 1500mm+ range.

The ‘Sadr Region‘ captured using the Askar SQA106 refractor telescope.
Unfortunately, many amateur astrophotographers will start with a large telescope that provides deep views, only to find that this method has a steep learning curve that only the most dedicated imagers will overcome.
The Capture Process
Astrophotography involves some really long exposures. In daytime photography, a 5-second exposure using a filter, low ISO, and f/22 can create some incredible landscape images. This can capture movements such as flowing water and passing clouds.
In astrophotography, we use ultra-long exposures to capture dim objects in space. I’m talking exposures of 3-4 minutes each or longer. The photo below features the California Nebula captured with the Apertura 75Q. Several 5-minute exposures were stacked together to produce it.
This photo of the California Nebula includes multiple exposures of 5 minutes each.
As the sensor records the light entering the camera, it collects much more detail than our naked eye could ever see. As well as faint details of galaxy spiral arms and nebulosity, we are also able to record the intense color of the gasses, dust, and stars in space.
Signal-to-Noise Ratio
To produce detailed images of these DSOs (deep-sky objects), we need to increase the signal-to-noise ratio of the image. The signal is the light collected by the camera, and noise is – well, you all know what camera noise is.
If you’ve ever spoiled an image in a low-light situation because of noise, you should see what happens in a single astro image frame! To maximize the data we collect under the stars, high ISO settings of 800, 1600, or more are often used. This, of course, creates a lot of noise.
To combat this, we can improve the signal-to-noise ratio by stacking several images together.
In the example below, I compared stacked sets of 2-minute light frames with a dedicated astronomy camera. Even though dithering or dark frame subtraction was not used, you can clearly see that the noise is reduced as more exposure time is added to the final integration.

The signal (the light in our DSO) continues to layer on top of each other, yet the noise falls in random patterns and eventually cancels itself out. I use a software application called DeepSkyStacker to combine multiple image exposures together for final processing.
The feeling of seeing your precious image get smoother and smoother as you stack more and more data together is euphoric. Yes, I get a little geeky when it comes to improving the signal-to-noise ratio of my astrophotography images.

Using DeepSkyStacker to stack and register individual images together.
Follow along with me in an Image Processing Tutorial using Deep-Sky Stacker and Photoshop.
I hope you have enjoyed this how-to guide on astrophotography for beginners. With the right tools and a little patience, you too will be taking amazing images of our night sky.
Download My Image Processing Guide
If you would like to learn about every astrophotography image processing technique I use in DeepSkyStacker and Photoshop, you can download my premium guide. The PDF download contains over 100 pages of the specific steps I take to process all of my images. The guide is available here.
 Related Posts:
 Related Posts:
- DSLR Astrophotography – 5 Ways to Improve your Images
- Photoshop Tutorial – Deep-Sky Image Processing
- Astrophotography Blog – My Top Posts
Resources:
- Astrophotography – 5 Expensive Beginner Mistakes
- How to take great photos of Star Trails – EarthSky
- Ultimate List of Best Astrophotography Lenses – Lonely Speck
- Astronomy Picture of the Day (APOD)